Table Of Content
Read the scroll that appears, then back out and look at the building on another part of the table. Turn the ring at the top so the smaller blocks area offset from the building towers. If you press the button on the very top, two of these smaller blocks will then switch positions.
The House of Da Vinci 3 Chapter 3 and 4 Walkthrough
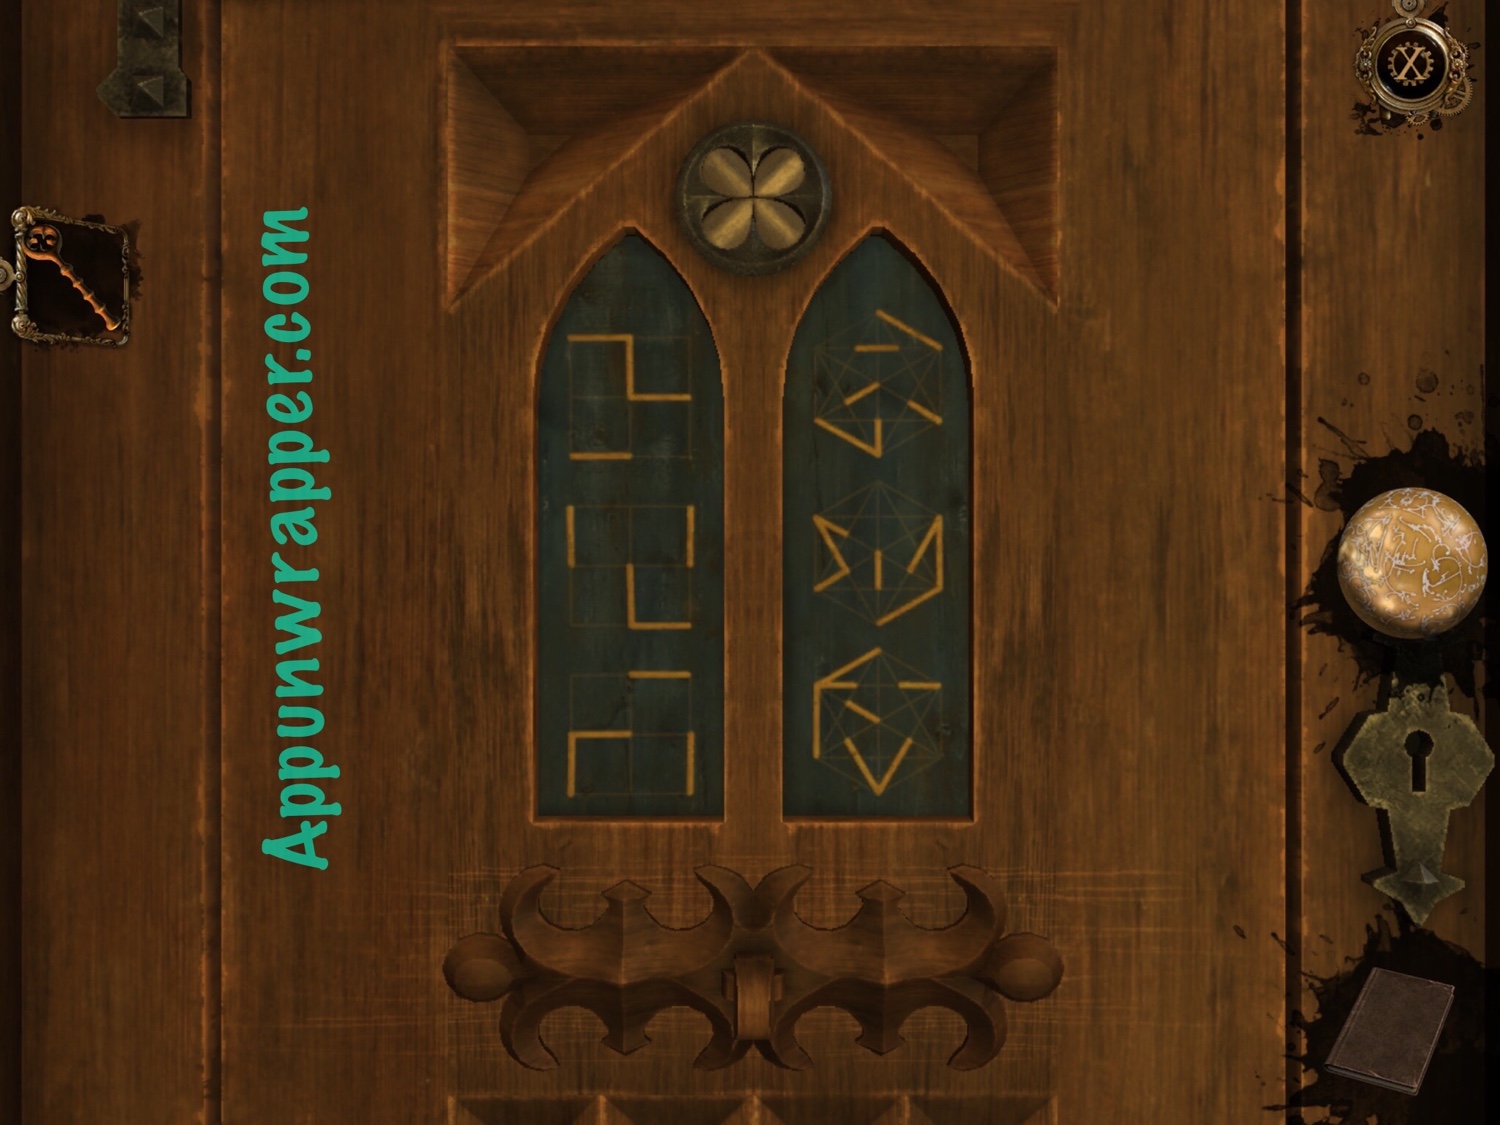
There comes a plateau down and out, onthere is a metal head of a ram and a gear. Zoom out and back inon the spire, go to the right. There is the place for the octahedron.Drag it there, pullthe panel down. Automatically you go to the front, at the bottom. Put the sliders tothe other side, the 2 points are now loose and now you turn them inside.You now have adodecahedron, a polygon.
Chapter 4
Attach your handle now, and turn it counter-clockwise until the rope reaches the ground. Head into the maze, then through the gate on the right. Rotate the ladder to the right, then focus on the bottom of the ladder. Attach your handle here and rotate it counter-clockwise until you automatically remove it again. Climb up the ladder and use your dome handle on the link between the rope and metal ring. Rotate this clockwise until the ring opens and the rope falls free.
Redfin agents serving Hollywood Hills
Insert your hexagonal weight here and the wooden screen will open. Go through the curtains ahead, then use your Oculi Infinitum. Look slightly left and take the forged metal ornament. Back all the way out to the siege tower and look at the right side. Insert the forged metal ornament here, which is an aiming device. Use the Oculi Infinitum again and look to the right to see your target in the distance.
Solve the Mysteries of The House of da Vinci, Now Available for iOS - AppAdvice
Solve the Mysteries of The House of da Vinci, Now Available for iOS.
Posted: Thu, 22 Jun 2017 07:00:00 GMT [source]
Slide the diamond catch to the left, then insert your key and drag it to the right. Turn the wheel that appears, so you can take another key. Now head down the stairs and insert this into the door lock. Turn the key, then the handle, and pull open the door. Go back to the split mirror and place your lens in the stand just to the right of it.
Examine this in your inventory and rotate both the top and bottom halves to end up with a wooden pulley. Look into the fireplace and retrieve your spring-powered lighter from inside the metal fixture. Turn around and look at the shelves of skulls on the wall behind you. Take the drawing from this shelf Viola Organista. Go back to the front of the siege tower and attach the ram to the wooden beam near the bottom.
Chapter 5
Here, you’ll see 12 circular chips (six on each side), a picture at the top of the mechanism, and at the center is a locked compartment. If you press on any chip, it will display a picture. This puzzle plays like a memory game wherein you’re supposed to match a pair of images by opening two chips. Click away the disc and the panel closes.The statue drops further down and there isanother puzzle. Drag the disc to the puzzle.III to the left inthe disk, turn up and slide the III up and to the right.Turn right again andslide IV up the disc, turn up. Slide the IV up and to the right.Turn the disk to theright again, II in and up.
Starter Guide to The House of Da Vinci 3 - Gamezebo
Starter Guide to The House of Da Vinci 3.
Posted: Thu, 11 Aug 2022 07:00:00 GMT [source]
Chapter 4: Rome (Borgia’s Hideout)

With each correct hexagonal marker chosen, the circular device will turn and change the symbol on its surface. You’ll know that it’s the right symbol you’ve picked as the marker will bear a red circle. Since the men are clearly inhospitable, pan to your left and you will see a makeshift gate of dilapidated wood. Approach it and you will see a chain hanging from one of the broken panels.
Chapter 6
This will happen twice, as there are two pairs of stained glass windows on this side of the chamber. Each time the windows are illuminated by a beam of light, the ornamental squares on either side of where the medallion has been placed will flip and reveal symbols. For the Medallion of Dawn, the first symbol to be revealed is a triangle with an eye in the middle, then three figures that look as though they are kneeling. A new sunflower sensor will rise up in the corner of the room - you must direct light beams at its front and side at the same time.
Open the tower fully and take out the wooden cylinder. Examine this in your inventory - slide the latch, then fold the arm until you create a crank. Use this on the hexagonal hole on the top of the sarcophagus next to the tower, and turn it until you can't turn it any more. Now focus on the 3 holes where a wolf's head is missing, and attach the one from your inventory. Slide this to the left, then examine the recess that is revealed. Insert the part of a mechanism your found in the picture frame, then pull it down and take out the cogwheel.
With this puzzle before you, scan your surroundings and go around the pub for a bit, seeing if there’s an alternative means of entry. You’ll see a few tables and chairs, as well as a door next to the bar. After being ushered inside, you walk up a short flight of stairs leading to three rooms. Additionally, items, tools, handles, and things that are colored red or have some kind of red wrapping around them are important. You’re going to see this a lot in Chapter 4 so consider these as subtle hints that tell you the significance or importance of an item or tool. One important tip we’d like to point out for these two chapters is to treat illumination (candles, sunlight, etc.) as hints in themselves.
Additionally, there are also Roman numerals scratched on the surface of the wood. You can rotate the cylindrical buttons so that the arrow pointer will face a particular number, all of which correspond to a specific drawer. For instance, the Roman numeral II corresponds to the second drawer from the left.
Go up the spiral staircase and move the large lever to the middle position. Turn the winch wheel until the barrel and the elevator both come to a stop. Get in the elevator and pull the lever here to the right - you will ride the elevator up to a new area. Turn around and look at the low bench along the wall. There is a small slot in one of the vertical columns, where you can insert the window crank.
You’ll notice that upon collecting the Stone Rosette, it is marked by gears on its icon. This means you need to view the item via your inventory to adjust it to its completed form. Thus, open your inventory and slide the top flower into the rosette. This will give you the completed item Stone Rosette with Protrusion. The notable change in this item is that the protrusion at the back is shaped like a cross.


No comments:
Post a Comment